What counts as “commercial brewing equipment” and how do the pieces fit?
At its core, a pro brewhouse is a coordinated system: grain handling, mash/lauter, kettle/whirlpool, transfer pump, plate heat exchanger, and an operator-friendly control panel. Downstream, you’ll rely on fermenter choices (classic conical fermenter, flexible unitank), a finishing brite tank, and utilities that keep everything stable and sanitary.
As a manufacturing team that engineers and installs complete lines, we design around real operators—brewer access, safe catwalks, and hoses that actually reach. Our clients in industry tell us the right layout shortens brew day, reduces cleaning time, and makes training easier. You also need the right equipment and supplies close at hand: seals, clamps, gaskets, tri-clamp fitting sets, and calibrated thermometers. That everyday readiness builds reliable habits and consistently quality beer.
Which brewhouse options suit my space and production goals?
Two big choices shape your brewhouse: vessel count and vessel roles. Typical brewhouse configurations include 2-vessel (mash/lauter + kettle/whirlpool), 3-vessel (adds a dedicated lauter or kettle), and 4-vessel (high-throughput). More vessels mean parallel steps and faster cycle times at higher volumes.
Comparison: vessel roles vs. throughput
| Configuration | Vessels | Typical Throughput | Who it fits |
|---|---|---|---|
| 2-vessel | Mash/Lauter + Kettle/Whirlpool | Moderate | Space-tight pubs with steady demand |
| 3-vessel | Mash + Lauter + Kettle/Whirlpool | Higher | Growth-minded teams adding turns/day |
| 4-vessel | Mash + Lauter + Kettle + Whirlpool | Highest | Regional brewery/production plants |
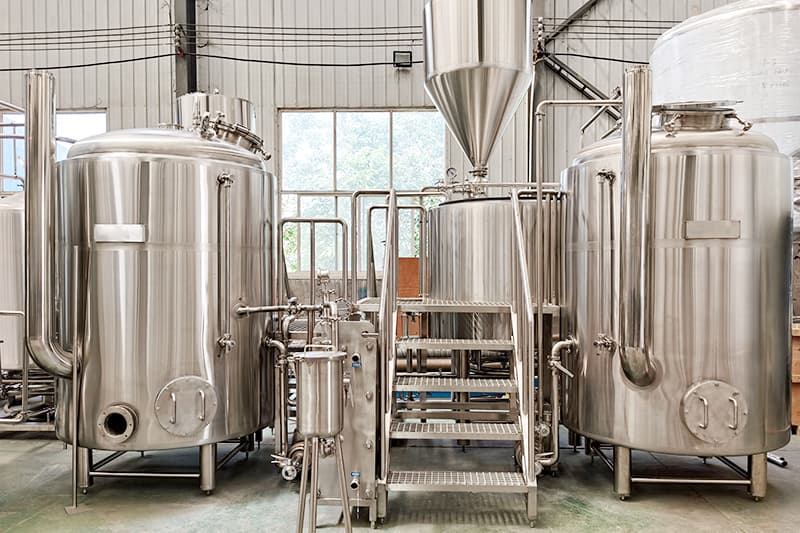
If you’re weighing the 2- vs 3-vessel brewhouse path, study real layouts and piping—spray balls, elbows, and elevation matter. A solid reference is this clean, operator-centric 3-vessel brewhouse design (note the transfer heights and platform ergonomics).
How does a brewing system move from mash to boil to whirlpool?
The hot-side path is simple—and every detail matters. You crush grain (right before mashing) and hydrate it in the mash tun. Gentle sparging raises extract, then wort flows to the kettle for the boil. After flame-out, you whirlpool to cone solids and push through the plate heat exchanger into your first vessel on the cold side.
A good brewing system uses the least energy to move wort gently. That means correctly sized pump heads, well-routed lines, and stable heating so you don’t shear or over-aerate. For larger builds—say a 50 bbl brewing system—study how the platform manages elevation, drains, and touchpoints: brewing system (50 bbl). Get these choices right before you brew your first batch.
Tanks 101: fermenter, unitank, and brite—what’s the difference?
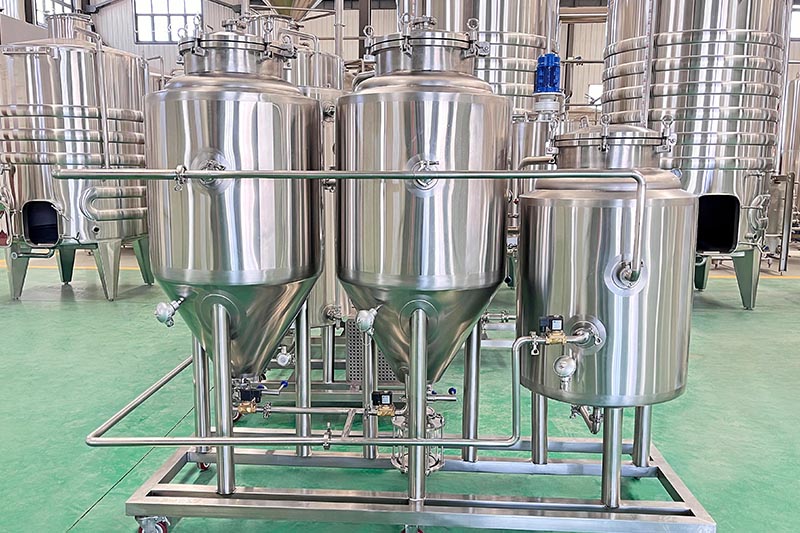
The workhorse is a conical fermenter—steep cone, racking arm, proper jacket coverage—so yeast compacts and transfers stay clean. A unitank combines fermentation and serving/conditioning with carbonation ports for fast turnaround. A finishing brite tank polishes and stabilizes before packaging.
Material and build quality matter. Specify stainless steel (often quality 304) with smooth welds and consistent passivation. We also recommend insulate panels, accurate jackets, and sanitary ports. Want to compare shell angles and port positions? Browse a modern stainless steel conical fermenter and a horizontal bright beer tank to visualize flow and cleaning reach.
What sizing should I choose—nano, 3.5 bbl, or 5 bbl—and how does it scale?
Sizing starts with sales and turns/day, then backs into pro gear that fits. A 3.5 bbl cellar is a nimble starter or pilot; 5 bbl favors pubs with steady taps and quick changes. Going nano doesn’t mean compromise; it means deliberate choices that keep the beer moving.
Rule-of-thumb table (illustrative)
| Size | Turns/Week | Typical Fermenters | Notes |
|---|---|---|---|
| 3.5 bbl | 3–5 | (4) 7 bbl | Pilot or split styles |
| 5 bbl | 3–6 | (4–6) 10 bbl | Adds seasonal breadth |
| 10–15 bbl | 3–7 | (6–8) 20–30 bbl | Regional draft packaging |
If you’re pricing compact lines, this nano brewery equipment for sale (1000 L) page shows footprints, rakes, and piping that reduce lift and steps.
Grain handling and the grain mill: why the roller gap is your quiet hero
Bad crush kills lauter speed and flavor. Choose a grain mill with a stable two-roller drive, and calibrate the gap for your grist. Keep dust down, route augers safely, and insulate noisy spots so your team can hear pumps and alarms.
To the hot side: an even crush supports a calm vorlauf. Flow stays linear, your pump works less, and the brewer spends more time watching clarity than fighting stuck beds. When we engineer mills and hoppers, we place cleanouts and guards where humans actually stand—and we plan for accessory storage (spare screens, belts, tools) that speeds resets.
Controls, precision, and cleanability: what really makes a system “pro”?
Repeatable flavor is built on precision control—valves you can reach, a control panel you can read at a glance, and loops that actually hold temperature. Jacket zones must cover the cone and cylinder evenly; jacket under-coverage creates hot stripes that stress yeast. For carbonation, a dedicated stone and gauge set give fast, reliable carbonation without chasing numbers.
We also think about cleaning from day one: open port access, smart drains, and the right spray pattern. Plan for cip connections that don’t drench the floor, and give the operator safe reach. Look at a modern automated beer brewing system (30 bbl) to see how controls and piping come together.
Stainless choices and sanitary fittings: why do details matter?
Pro lines live and die by their connections. Tri-clamp fitting selections, gaskets, and ferrule lengths change how quickly you can break down, clean, and re-build. True sanitary welds (low roughness) and consistent ferrules prevent micro-harbors. Spec stainless hardware that resists galling, and lubricate threads that need it.
We specify stainless steel contact parts and professional brewing gaskets that handle both caustic and acid cycles. The result: fewer drips, fewer surprises. You’ll feel the difference every time you brew.
From fermentation to packaging: keg, can, or bottle?
Cold side choices affect freshness. A jacketed conical supports cool ramps and diacetyl rests. After fermentation, choose your finish: serve direct, route to brite, or stage for packaging into keg, can, or bottle as your tap mix demands.
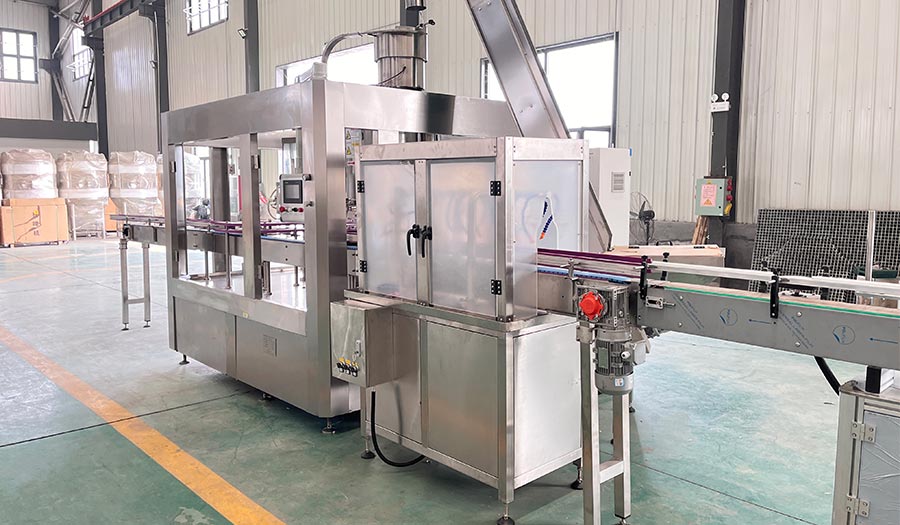
If you’re can-forward, see a compact beer can filling machine that matches pub-scale outputs. Bottle-lean? Explore bottle lines with pre-evac and CO₂ pre-flush to protect aroma. Right-sized gear minimizes oxygen pickup without slowing turns.
Cost of ownership: energy, cleaning time, and serviceability (mini-data)
Mini chart: estimated brew-cycle time savings by vessel count
| Scenario | Turns/Day | Approx. Hot-Side Hours | Note |
|---|---|---|---|
| 2-vessel | 1–2 | 6–8 | Simple piping, fewer valves |
| 3-vessel | 2–3 | 5–6 | Parallel lauter/heat |
| 4-vessel | 3–4 | 4–5 | Highest throughput, more valves |
Serviceability matters. Route hoses to avoid tripping; keep the brewer’s path clear; add sight glasses where you actually need them. When we engineer lines, we also plan training and spares so your supply chain doesn’t stall a weekend.
Case study: from one pub to a regional footprint
A brewpub launched with a turnkey brewing system and a tight platform. Year 1, they brewed craft beer in 3.5 bbl turns, adding seasonals. By Year 2, demand for their pale grew; they scaled to 5 bbl and added a unitank to free tank time. Because the brewhouse shared controls with cellar loops, the operators already knew the screens. A year later, they introduced cans with a simple line—proof that great design accelerates growth in the commercial beer brewing landscape.
What should I look for when comparing quotes?
- Materials & finish: stainless thickness, weld quality, and polishes.
- Utilities: jacket coverage, glycol headers, and insulation.
- Workflow: valve height, ladder points, and drain slope.
- Documentation: P&IDs, wiring diagrams, and maintenance notes.
- Support: install, training, parts supply, and warranty.
When you’re ready to compare layouts, this main beer brewing equipment hub shows how sizes step from pub to production; this broader brewery equipment for sale (20 bbl path) page helps you cross-check footprints and utilities.
FAQ: practical answers for busy teams
What’s the difference between a conical fermenter and a unitank?
A conical fermenter handles primary and transfers to a finishing tank. A unitank is built for “ferment and serve”—ports for carb stones and PRVs—so it can do both jobs in one vessel.
Do I need microbrewery equipment if I’m only brewing beer for one pub?
If you’re brewing beer for a single location, start small and modular. “Microbrewery equipment” often just means pro-grade hardware at smaller volumes. It keeps options open without locking you into a big footprint.
Can an all-in-one system really work for my team?
An all-in-one rig helps where space is limited. You trade some parallelism for simplicity. If you brew fewer SKUs, it’s a smart starting point—and you can expand with a brite tank and a small canning line later.
What about fittings and hoses—how many do we really need?
Start with a labeled kit of brewing supplies and tri-clamp fitting spares sized to your ports. Keep clamps, gaskets, and hose lengths you use daily. Fewer “where’s that reducer?” moments means smoother days.
Is 304 stainless good enough?
For most beer, quality 304 is a durable choice. Specify correct jackets, polish, and passivation, and keep it clean. Some sour workflows prefer 316 in select parts, but 304 anchors most of the industry.
What’s the difference between pro brewing and home methods?
Pro brewing adds consistency: better heat control, faster knock-out, accurate jacketed conical control, and safer platforms. The physics is the same, but the repeatability is night-and-day.
A quick glossary in context (used naturally above)
- beer brewing (process end-to-end), beer brewing equipment (hardware set)
- brewhouses (plural rigs across sizes), brewhouse options (layout choices)
- brewing equipment and supplies (complete kit for operations)
- brewing beer (the act), professional brewing (repeatable, spec-driven)
- keg, roller mill, liquor tank, wort cooling, accessory storage
- nano, premium finishes, high quality welds, precision controls, one-stop shop support
Summary
- Fit the system to the room: vessel count, pumps, and platform shape set your throughput.
- Choose well-built stainless steel tanks; check welds, jackets, and ferrules.
- Plan controls for precision and visibility; design cleaning into day one.
- Size smart: from 3.5 bbl to 5 bbl, scale tanks and utilities with demand.
- Don’t forget the whole kit—brewing equipment and supplies plus a clear training plan.
- Think ahead to packaging and service; start simple, grow in steps.
As a Brewing Equipment Manufacturing team, we engineer and deliver pro lines that match your goals—from pilot rigs to production cellars—with layouts that help you brew faster, safer, and better. When you’re ready, we’ll build your next step together.
- Precision: multi-zone jackets & PID controls stabilize fermentation.
- Efficiency: extra vessels cut turn time by up to 30 %.
- Sanitary: tri-clamp fittings and full CIP loops slash labor.
- Scalability: modular skids expand from 3.5 bbl to 30 bbl.
- Sustainability: heat-recovery lowers gas costs & CO₂ load.