You want to brew world-class beer, but space, budget, and time stand in the way. Delays and downtime drain cash. A smart nano setup fixes that—compact, efficient, and built for growth—so you can start pouring sooner, not later.
A modern nano brewery equipment package combines a small brewhouse, precise controls, and clean-in-place (cip) to turn grain into quality wort with repeatable results. Choose the right kettle, mash setup, and fermenter size, and you can run frequent small batch brews, dial recipes, and scale when demand grows.
1. What is a nano brew brewing system and who is it for?
A nano setup is a compact, pro-grade platform for startup founders, brewpub teams, and R&D pilots. It lets a brewer brew more often, learn faster, and sell fresher beer with less risk. It’s also ideal for beverage innovators (cider, seltzer, craft beer) testing flavors before committing to bigger tanks.
If you want to see a very small, real-world footprint, review this 100 L craft brewery equipment configuration—its scale and utilities are perfect for a tight back-of-house and frequent brewing windows. 100 L craft brewery equipment

2. How many batches can a pilot brewing system run each week, realistically?
Brewing frequency depends on your utilities, cooling, turnaround, and cellar space. Many teams brew three to five days weekly, stacking short runs and shifting popular beers into brite tanks for quick service. This is where strong scheduling and clean brewing operations matter.
A pilot system adds flexibility. You can run test recipes mid-week, switch back to your flagship Friday, and keep tanks turning. More turns mean fresher pours and faster feedback from the taproom.
Quick table: brewhouse cadence basics
| Item | Typical number |
|---|---|
| Brewhouse size | Used once above: see H1 |
| Batches per week | 3–7 (with tight cleaning and fast chilling) |
| Time per brew day | 6–8 hours (grain-in to knock-out) |
| Cold-side dwell | 10–21 days, depending on style |
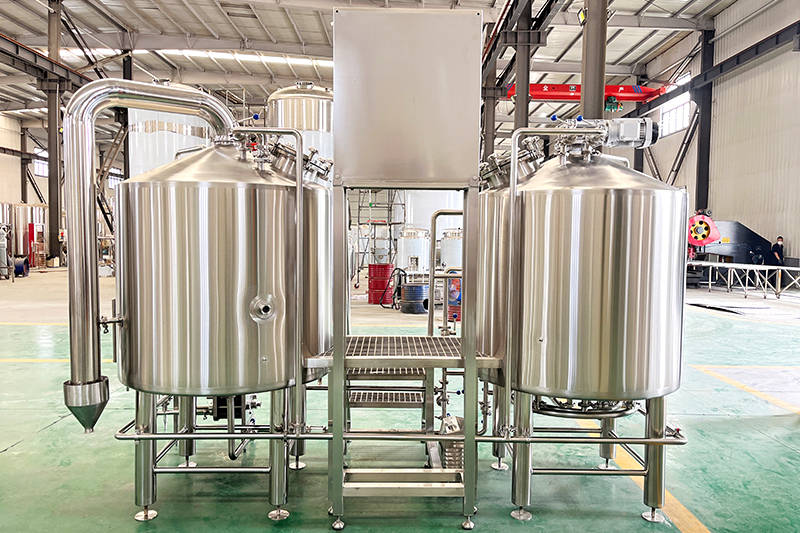
3. Mash tun vs kettle: what matters most in a nano system design?
On small systems, the mash tun needs precise heat stability, solid false bottom, and a robust raking arm. The kettle needs strong rolling boil and a good whirlpool port for clear wort. If your design gets these right, your brew day is smoother, faster, and more repeatable.
Hardware details count. Look for full-size manway, clean interior weld, and tri-clamp ports for hoses and probes. And make sure your controls—call them your modern brewtech—are simple, reliable, and easy to service.
If you want to compare space and workflow, study a compact 2-vessel brewhouse layout to visualize how the vessels pair up. 2-vessel brewhouse
4. Do I need bottom drain kettles and a hot liquor tank?
Bottom drain kettles speed knock-out, reduce carryover, and keep piping short. They also help you save on shipping costs by enabling shorter frames and tighter footprints. A dedicated hot liquor tank (HLT) lets you stage the next brew, rinse, and hit mash-in temps faster.
Add a sight glass, reliable valve, and a sanitary sample port. Plumb the drains so hot water meets the floor drain without splash. It’s small stuff, but it keeps your brew day clean and safe.
5. Which brewhouse layout fits best—2-vessel or 3-vessel system?
A 2-vessel rig (MLT+Kettle/Whirlpool) is compact and efficient for small spaces. A 3-vessel system (separate mash, lauter, and kettle/whirlpool) boosts throughput and clarity on busy days. Choose based on staff count, expected menu, and the number of times you’ll brew each week.
Many brewhouse frames ship pre-wired with pumps, heat exchangers, and controls. Pick standard equipment that future technicians recognize, and make sure the skid has room to add a second pump or extra valve later. Good planning now means less change-order stress later.
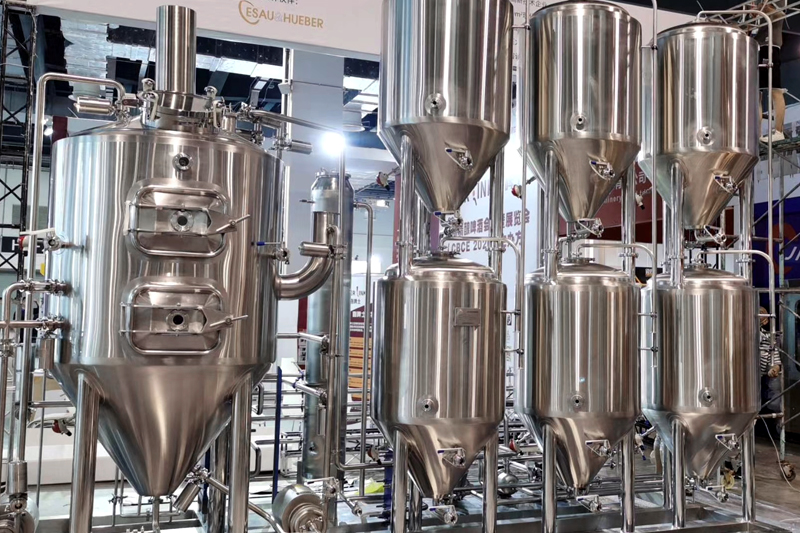
6. Fermenter, brite tanks, and temperature control: getting beer quality right
Your cellar sets the ceiling for beer quality. Look for jacketed tanks with precise temperature control and cleanly routed glycol lines. A single fermenter can carry your flagship, while two brite tanks keep taproom beer bright and ready.
If you’re mapping your cellar, examine a stainless steel conical fermenter spec to understand jackets, dimple area, and blow-off routing, and pair it with a serving-ready bright vessel. Stainless steel conical fermenter | 10 bbl bright tank
7. Keeping gear sanitary: CIP, sanitizer, and maintenance checks
Small or big, clean wins. A good cip cart (pump + spray ball) and the right sanitizer keep vessels sanitary between turns. Build written maintenance checks into each shift so everything stays in working condition and you catch issues before a malfunction shuts down a weekend.
Neglected brewing equipment drives up repairs or replacements and drags calendars. The wrong equipment can result in long cleaning days, dull beer, and lost margins. Keep hoses labeled, verify seals, and log temps as part of regular maintenance.
8. Valves, valve tree, and fitting choices: build it safe, easy to clean, and fast to run
Good piping design means fewer leaks and faster turnarounds. Specify a valve tree that makes sense to your team, accessible handles, and a sanitary fitting set for hoses. A single mis-routed fitting wastes time every brew day.
Use full-port butterfly valves where you need flow, and ball valves where you need control. Keep ferrules aligned so you can break down lines fast and keep surfaces easy to clean. Don’t forget spare gaskets and clamps—small items that save entire brew shifts.
9. Can a nanobrewery scale to larger breweries without wasting money?
Yes. Start small, buy skids that roll forward, and don’t lock yourself into odd parts. Your nanobrewery can scale up to larger breweries by adding tanks, upgrading chillers, and expanding cellar manifolds. Thoughtful steps mean saving money while you grow.
When expansion hits, align your sizes with common specs (e.g., 1 barrel for R&D, mid-cellar growth, then package-scale later). Plan utilities and drains to add tanks without tearing walls. If you brew cider or tea, you can even bolt on kombucha brewing equipment as a side stream to widen your menu. Kombucha brewing equipment
10. What should I ask an equipment supplier before I buy?
Ask about steel grade, frame rigidity, insulation, control logic, and after-sales support. An equipment supplier should share drawings, include wiring schematics, and provide install guidance. Make sure the vendor stocks critical spares so you can brew through holidays.
We’re a Brewing Equipment Manufacturing plant that designs and builds skids for small scale and production environments. We fabricate tanks in-house, test every pump, and document the package. That industry leading approach shows in the build quality you can feel.
11. Case study: from homebrewing to full-scale production on a fraction of the cost
A two-person team moved from homebrewing to a 1-to-3 vessel path. They started with 1–2 brew days weekly, scaled their cellar, and added a compact pack-out line at a fraction of the cost of a big build. The taproom opened with four rotating styles and a flagship lager.
Along the way they compared notes with peers in the brewing community—names you’ve heard like ss brewtech, ruby street brewing, and psycho brew. The lesson: buy once, plan growth, and keep the process lean. When they added service tanks, table beers became weekend best-sellers.
Packaging later? A small beer can filling machine bridges the gap between draft-only and retail. It’s modular, dependable, and slots into tight rooms. Beer can filling machine
“We brewed small, learned fast, and expanded without stopping service. Clean design and honest controls kept us brewing while we grew.”
12. Budget, energy consumption, and financing options: making a cost-effective plan
Start with utilities and power. Right-size burners or elements, insulate lines, and monitor energy consumption on brew days. These steps are cost-effective and pay back fast. If capital is tight, explore financing options that match your sales ramp and seasonality.
As you budget, standardize hoses and clamps, buy one good pump, and stage tanks in phases. That keeps cash flexible and brew days smooth. Good records help—cost per pint, propane vs electric comparisons, and seasonal turns. Small wins add up.
Hardware details most new teams ask about (quick info table)
| Component | Why it matters | Tip |
|---|---|---|
| Kettle | Vigorous boil, clean trub cone | Add tangential port for better whirlpool and clearer wort |
| Mash tun | Stable bed, consistent runoff | Watch rakes and false-bottom gaps |
| Brite tanks | Quick service, stable carbonation | Use carb stones and accurate gauges |
| Piping and valves | Flow control and safety | Label lines; keep spares handy |
| Ports & clamps | Sanitary and modular | Use common sizes to avoid odd parts |
Simple size & yield snapshot (for planning)
| Common size | Approx. yield | Typical turns | Notes |
|---|---|---|---|
| 1bbl (≈117 L) | Taproom-friendly | 3–5/week | Great for pilots and seasonal brews |
| 1 bbl & 3.5 bbl | Already used in H1 | — | — |
This table helps set expectations and staffing. Brewing more often is fine if cleaning is quick and transfers are smooth.
Choosing controls and panels (quietly powerful “brewtech”)
Your control panel should feel obvious on day one. Modern brewtech keeps temperatures steady, alarms clear, and pump hand-offs safe. Add flow meters later if you like; what matters now is clarity and uptime.
If you want deeper automation down the road, start with expandable I/O. That way your new equipment upgrade is a plug-in, not a rebuild.
Piping, drains, and floors—design for tomorrow
Put trench drains where hoses actually run. Keep outlets away from walkways. Route to the floor drain with the right slope. Mark hose paths on the wall so new staff can brew confidently by day two.
Use sanitary ferrules everywhere you can. Quick changes shorten cleaning and keep the shift moving. Plan space around the brewhouse so you can swap out a pump without moving the whole skid.
Materials and fabrication that stand up
You want tanks that last a decade. That means strong jackets, full-coverage insulation, and smooth seams. Check the manway profile, inspect a sample weld, and confirm thickness. Smooth interiors clean faster and taste better.
Add sample ports on the kettle and at the lauter run-off. Make sure your gasket kit matches your ports, and confirm hose lengths once everything is in place.
From pilot brewing to production—how the path unfolds
Run small, sell fast. Use pilot brewing to fight off-flavors, test yeast blends, and gather taproom data. When a beer flies, roll it into the main board. That gives you efficient brewing and reliable cash-flow.
This is also where your pilot brewing system paid off earlier in the article—tight turns, low risk. As your sales grow, add tanks and glycol capacity, then a small pack-out station.
Capacity planning and common terms at a glance
- “1 barrel” often describes a tiny production step used for recipe work.
- “bbl” is the standard unit in the U.S. for brewery volumes (you saw it in H1).
- A compact nano brewhouse keeps lines short and cleans fast.
- Many teams aim for two or three brew days weekly at launch.
For deeper specs on small-to-mid systems, browse sizes above and look at practical cellar pairings like conical + bright. You’ll also find step-up options such as 200–500 L kits when you’re ready to add throughput. Craft beer brewing equipment (200 L) | 500 L brewery equipment
Installation checklist you can borrow
- Power, steam, or electric verified and labeled
- Water lines mapped to the kettle and HLT
- Venting clearances measured
- Glycol run tested to cellar
- Valve tree tagged; hoses color-coded
- CIP spray balls tested
- Fitting kit checked and counted
FAQs
What size should I start with if I’m new?
Start small and brew often. A compact system lets you learn fast, keep the beer fresh, and adjust menus. Expand once you understand your weekly flow.
Do I need brite tanks on day one?
Yes, they help with readiness and clarity. Brite tanks also protect serving quality and free your fermenters for the next brew.
How do I keep cleaning fast between turns?
Design for speed: short hoses, clear drains, and simple valve routes. A small cip cart and the right sanitizer cut downtime.
Can I run mixed beverages (cider, tea) on the same skid?
Yes—just plan cleaning and cross-contact protocols. Some teams add a side stream like kombucha with separate hoses and gaskets.
Should I worry about control panels early?
Yes. Simple, reliable control logic keeps you brewing. Expand later with temperature probes and flow meters as you grow.
What’s the difference between “brewing equipment” and “brewery equipment”?
People use both. In practice they cover the same items: brewhouse, cellar, pumps, and controls. Buy for durability and service access.
Sources and further reading
- small brewery planning, safety, and quality guides.
- cleaning-in-place and sanitation best practices.
- energy management in food and beverage.
- definitions and context on brewing volumes and terminology.
Bullet-point summary
- Pick a compact brewhouse you can run often; schedule cleaning so you brew more.
- Get the mash and kettle right; clear wort and stable heat fix many problems.
- Size cellar smart: fermenter + brite tanks with tight temperature control.
- Design piping, valve tree, and fittings for speed and safety—make it easy to clean.
- Plan growth to step into mid-sizes without waste; buy parts you can reuse.
- Keep logs, watch energy consumption, and stick to regular maintenance to avoid repairs or replacements.
From Grain to Glass—Fast & Flexible
1 – 3.5 bbl
3 – 7 turns
3 Ways to Boost Efficiency
- Bottom-drain kettles speed knock-out and cut cleaning time.
- CIP loops slash water & chemical use by up to 30%.
- Glycol-jacketed fermenters keep temps steady & beer quality high.