
What is microbrewery equipment, and what makes it “commercial”?
When buyers say micro brewing equipment, they usually mean a compact set of tanks and controls that still runs like a production line. In our beer brewing equipment manufacturing plants, we define it as gear designed for repeat batches, fast cleaning, and safe utilities—not just “bigger homebrewing.”
A true brewing system for business includes more than vessels. It includes layout, piping, valves, sensors, and documentation so your team can brew on schedule. That’s why we focus on system design first: your menu, your footprint, your staffing, and your expansion plan. The stainless steel may look the same, but the internal structure and control choices are what make high-quality beer repeatable.
Here’s the simple test I use with new owners: if you can’t explain your transfer path and cleaning path on one sheet of paper, you’re not ready to order metal yet. Good planning prevents expensive “surprises” like blocked drains, wrong voltage, or a cellar that can’t handle peak fermentation.

Equipment do you need to brew at a true production pace?
People ask me “equipment do you need” and I answer with a checklist—but I also warn them: the equipment needed depends on your sales model (taproom vs distribution) and your product mix (beer, cider, kombucha, spirits wash, etc.). Still, most projects share the same backbone.
Essential equipment (core production path):
- Malt handling: mill machine, grist case (optional), dust control
- Hot side: water treatment (often), mashing system, boil vessel, whirlpool (if used)
- Cold side: at least one fermenter (often more), cooling loop, glycol/ice-water system
- Beer finishing: conditioning system, optional filtering system, carbonation and serving
- Packaging: draft and/or small pack (packaging equipment)
- Cleaning: CIP-style tools, chemicals, spray balls, and procedures to sanitize
Quick planning table (starter checklist)
| Area | What you buy | What you confirm before buying | Common mistake |
| Hot side | vessels, controls, piping | water, power, drainage, steam/glycol | undersized drains |
| Cellar | fermenters, cooling, valves | glycol load, insulation, ventilation | weak cooling plan |
| Packaging | keg, fillers, rinse/sani | CO₂ supply, space, wet floors | no buffer area |
| QA & safety | sensors, SOPs, PPE | local rules, training, records | “we’ll do it later” |
If you tell me your target liters per week and your available utilities, I can usually map a practical list of equipment you need in one working session—then we refine it into build drawings and a control list.
How does a brewhouse flow work—mash, kettle, wort, and transfers?
I like to explain the brewing process as a “clean, one-way road.” Grain goes in. Beer goes out. Cleaning loops back safely.
On brew day, you mash in the mash tun, hold temperatures, then move through lautering to separate sweet liquid from grain. That liquid is wort. You then boil it in a kettle (many teams call it a brew kettle) to sterilize, drive off unwanted volatiles, and set bitterness. Late additions like hop go in here, and this is where a brewer’s recipe really shows up.
A smooth hot-side flow often looks like this:
Mill → Mash → Lauter → Boil → Whirlpool → Cool → Ferment
Small details matter. A single wrong slope in a pipe can trap liquid. A poor vent can cause slow transfers. One overlooked fitting can turn cleaning into a daily headache. That’s why we engineer the piping and valve placement as carefully as the tanks.
And yes—language matters on site. When we train operators, I still use the same simple phrasing: “Keep the hot side clean, keep the cold side cleaner, and keep your hands off open ports.” It helps teams brew the best beer with fewer mistakes.
What size should you choose: 3.5 bbl or bigger for pro brewing?
Batch size is where dreams meet math. A 3.5 bbl system can be perfect for a small taproom, pilot production, or a brand that wants variety. But for distribution, you may outgrow it quickly. The key is not ego—it’s tank turns and labor hours.
Here’s a practical sizing guide we often share:
| Goal | Good starting size | Why |
| Taproom with frequent rotation | 3–5 bbl | supports small batches and variety |
| Busy brewpub | 7–10 bbl | fewer brew days, steadier supply |
| Small regional distribution | 10–20 bbl | better labor efficiency at commercial scale |
If you’re doing pro brewing, plan for the cellar first. Your brewhouse only makes wort. The cellar makes money. More fermentation volume means you brew less often for the same output—and your team can focus on quality.
A note from our side as a manufacturer: we build custom designed layouts because real buildings are messy. Columns, stairs, low ceilings, narrow doors—these are normal. Your system should fit your room, not the other way around.
Fermenter choices: unitank vs brite tanks—what changes in daily work?
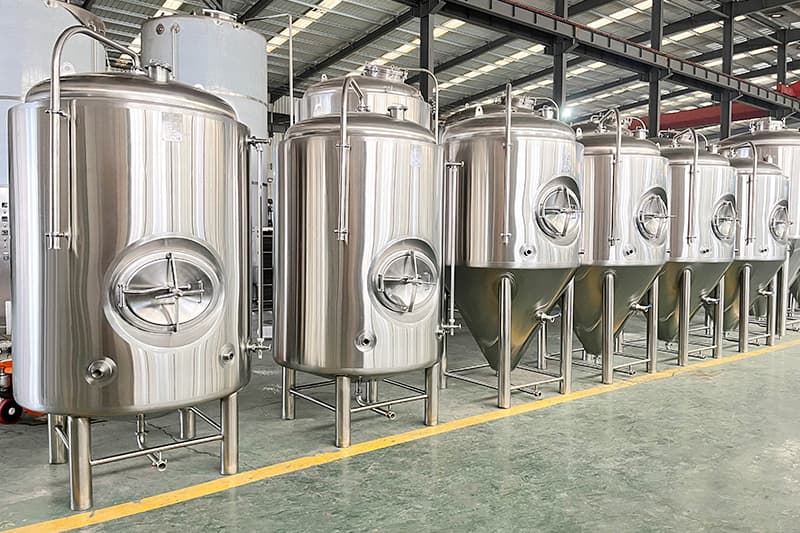
A fermenter is where your beer is born, but it’s also where schedules live or die. Most small producers start with conical tanks because they’re flexible and easy to manage. A conical fermentation vessel helps you harvest yeast, drop trub, and control clarity.
A unitank lets you ferment and carbonate in one vessel. That reduces transfers and cuts oxygen pickup. It often saves space too, which matters when you have a small footprint site.
So where do brite tanks fit? They shine when you package often, want stable carbonation, or need a buffer before serving. I also like them for beer that benefits from a calm finishing stage—less movement, fewer surprises. In some designs we add a dedicated brite step so the team can separate “making beer” from “serving beer” cleanly.
My rule of thumb (simple, not perfect)
- If variety and flexibility matter most: more fermenters, fewer extras
- If packaging and speed matter most: add brite capacity earlier
- If staffing is tight: reduce transfers and simplify valves
Fermentation is not magic, but it is biology. Good fermentation needs steady cooling, stable setpoints, and calm handling. Your team should control fermentation temperature like they control cash flow—carefully.
Cooling and temperature control: wort chiller or heat exchanger?
After the boil, you need to cool wort fast and safely. This is where many new teams under-spec their system. Warm wort is a risk zone, and slow chilling delays the day.
You typically choose between a wort chiller approach (common wording for compact systems) and a plate heat exchanger setup that scales well. Both can work, but the sizing and water plan matter more than the label.
What we check when we design your cooling:
- Incoming water temperature and seasonal swings
- Flow rates and pressure stability
- Target knockout temperature (for ales vs lagers)
- Glycol capacity and line insulation
- Sensor accuracy and control logic
You also need solid temperature control on the cellar side. Even the best tank loses value if the cooling loop is weak. In our factory testing, we pressure-check jackets, validate sensor ports, and confirm that your valve mapping supports stable cooling—because fast cooling plus stable control is how you protect flavor and reduce off-notes.
Pumps, tri-clamp connections, and sanitary fittings—what fails first?
If tanks are the “muscles,” piping is the “nervous system.” The system fails where shortcuts hide: connections, pumps, and cleaning access.
For safe, fast transfers, we design around sanitary connections like tri-clamp hardware and correct gasket choices. We also specify thread types where needed (for example, npt on certain utility accessories), but we keep product-contact paths sanitary.
On many builds, we include a dedicated brew pump on the hot side and a separate wort pump strategy depending on layout and head height. This is not about buying more pumps. It’s about stable flow, safe cleaning, and less operator stress.
A small but important warning: avoid mixing “pretty” DIY parts into a commercial line. I’ve seen projects use weldless add-ons that made sense for home brewing, but they created leak points and cleaning risks on a real line. In business, fewer leak paths equals fewer bad days.
Electric brewing vs steam: selecting the right heat source and utilities
Some sites love electric brewing because it avoids boiler permits and simplifies installation. Others prefer steam because it scales nicely and gives a classic, responsive boil. The best choice depends on your power availability, energy costs, and local rules.
Electric setups often use internal heating elements and need careful wiring, grounding, and safety interlocks. Steam setups need a boiler or steam generator, plus steam piping, traps, and ventilation planning. Either way, your heat source has to match your brew schedule.
If you’re not sure, I usually ask two questions:
- How many brew days per week do you want, and how long should each day be?
- What utilities are already strong in your building (power, gas, water)?
And remember: “simple” is a feature. A system that your team understands will make more consistent beer than a complex system no one trusts.
Packaging: kegging or can—how to protect flavor and margins
Packaging is where great beer either stays great—or gets damaged. Oxygen pickup, poor sanitation, and inconsistent fills ruin brand trust fast.
Most startups begin with draft. Kegging is flexible and lower cost than a full small-pack line, and it suits taprooms and local accounts. If you plan to distribute widely, adding a packaging system for a can format may improve shelf presence and logistics, but it also increases QA needs (CO₂ management, seam checks, dissolved oxygen control).
Packaging decision table (simple view)
| Packaging path | Best for | Watch-outs |
| Kegs | taprooms, local accounts, fast rotation | cleaning discipline, CO₂ supply |
| Cans | retail, wider distribution, branding | DO control, seam quality, training |
A short quote I share from a veteran brewer who visited our plant:
“The filler doesn’t forgive. If the beer isn’t stable and clean, the package will tell the truth.”
If you’re aiming for the best beer possible, treat packaging as a process, not a machine purchase. It’s where “good enough” stops working.

Cleaning, safety, and QA: easy to clean design, sanitize routines, and standards
Cleaning is not the boring part. Cleaning is the profit protector.
We design lines that are easy to clean, with proper slopes, drain points, spray coverage, and access for inspections. On commissioning, we train teams on how to sanitize safely and consistently. A strong cleaning routine reduces infections, reduces downtime, and protects your brand.
Many buyers also ask about nsf expectations or “food-grade” compliance. Requirements vary by market and application, but you should always demand:
- Material certificates for product-contact parts
- Weld quality and finish standards
- Pressure testing records
- Control cabinet safety checks
- Documentation for maintenance and spares
If you serve food or run a brewpub chain, these records also help when your auditors visit. For technical guidance, industry groups like the Brewers Association publish practical resources, and quality groups like the ASBC share methods used across modern brewing.
A realistic budget view: cost of opening and what buyers miss
The cost of opening is rarely “tanks only.” It’s tanks plus utilities, install, training, and downtime risk. I recommend you budget in layers:
- Equipment (vessels, controls, piping, packaging equipment)
- Shipping and import
- Installation (rigging, welding, insulation, drains)
- Utilities upgrades (power, water, glycol, CO₂)
- Commissioning and training
- Spares and service
Below is a simple range table we use early in planning (numbers vary by country, brand level, and scope):
| Category | Typical share of total budget |
| Brewing and cellar equipment | 40–60% |
| Installation and utilities | 20–35% |
| Packaging and cold storage | 10–25% |
| Training, spares, QA | 3–10% |
Mini “chart” to visualize priorities
Budget impact (low → high)
Training & SOPs ███
Packaging ███████
Utilities & install ██████████
Tanks & controls ███████████
If you need to start a microbrewery, don’t buy pieces. Build a plan to complete your microbrewery equipment as a system—with drawings, timelines, and clear responsibilities. That plan is what keeps your project from drifting.
Case study snapshots from the factory floor
Case 1: Startup craft brewery with tight space
A new team wanted variety and quick rotation. We suggested a compact hot side and a cellar that could expand later. The result: fewer transfers, fewer “oops” moments, and smoother training for a new brewer. Their biggest win was planning the piping and cleaning routes before the first tank arrived.
Case 2: Brewpub & restaurant chain expanding output
They already knew their recipes and demand curves. Their main goal was consistency across locations. We focused on controls, repeatable procedures, and spares strategy so their operators could produce beer with the same profile week after week while still experimenting seasonally.
Both projects had one thing in common: they treated the system like a production tool, not a sculpture.
FAQs
What is the difference between home brewing gear and commercial gear?
Commercial gear is built for repeated use, faster cleaning, safer utilities, and reliable control. It’s designed for producing beer every week with less downtime, not occasional weekend batches.
How many fermenters should I start with?
Start with enough fermentation volume to match your sales pace. Many small teams begin with at least two to four tanks so they can stagger batches and avoid running out of beer during peak demand.
Should I buy brite tanks right away?
If you will package often or want a steady buffer for serving, brite capacity helps early. If you are taproom-only and rotating constantly, you may prioritize more fermentation volume first.
What utilities matter most before installation?
Water supply and quality, electrical capacity, drainage, ventilation, CO₂ storage, and cooling capacity matter the most. Weak utilities cause more delays than equipment lead times.
Is a pilot system worth it?
A small pilot system is great for recipe testing, staff training, and seasonal releases. It also helps you validate ingredients and process settings without risking full-scale batches.
How do I choose a supplier for brewery supplies and service?
Choose a partner that offers drawings, commissioning, operator training, spares planning, and clear warranty terms. Global service experience matters if you’re exporting beer or opening multiple locations.
Sources and practical references
- Brewers Association (industry guidance and quality resources)
- TTB (Alcohol and Tobacco Tax and Trade Bureau) (US alcohol compliance overview)
- ASBC – American Society of Brewing Chemists (methods and technical standards)
- NSF (food equipment and sanitation context)
Key takeaways to remember
- Treat your system as a full production path, not a pile of tanks.
- Size the cellar first; fermentation capacity drives output.
- Keep transfers simple and sanitary—connections and cleaning access matter.
- Cooling and control protect flavor more than “shiny steel” does.
- Packaging is a process; protect beer from oxygen and poor sanitation.
- Budget for utilities, installation, training, and spares—these decide your launch date.
- If you want reliable, customizable support, work with a manufacturer that designs, builds, tests, and commissions as one team.
If you want, tell me your target batch size, building constraints, and whether you plan to sell mostly draft or packaged product. I’ll outline a practical system scope that fits your space and your growth plan.